
Corset with Book Pattern
As seen on PatternReview
APR 26, 2022. PUNTA GORDA. by Heidi (Chimera Costumes).
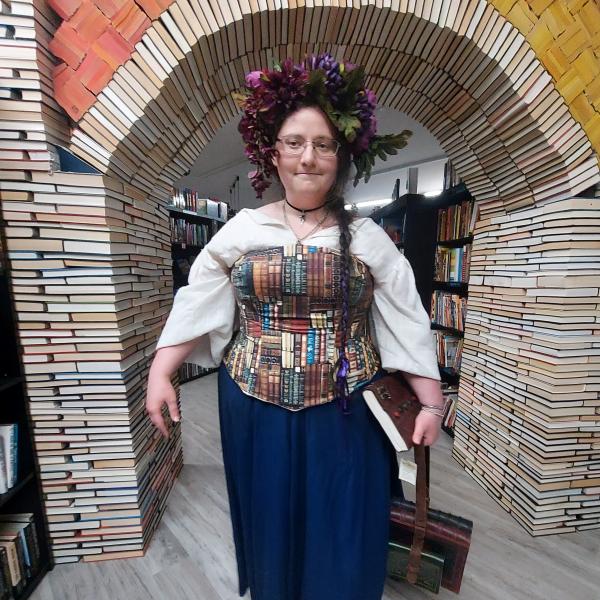
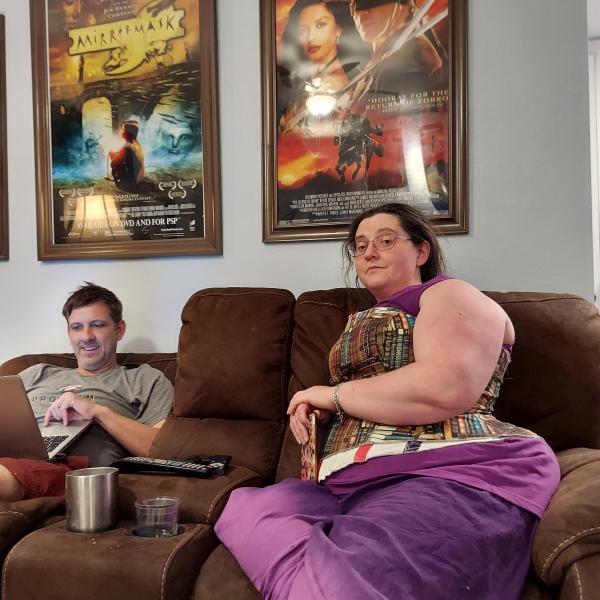
This week I made a custom corset with Amber, who dearly loves The Hobbit. What do you wear when books are life? A corset covered in books of course!
I've been sewing for 23 years and making corsets for about 13 years. They're one of the most challenging parts of costuming because they require a very precise fit (sometimes with tolerances less than 1/16 of an inch). Amber is also a costumer and seamstress but she is new to corsetry, so I spent some time drafting a pattern that will fit her perfectly. The goal of this project was actually just to make her a well-fitted pattern (so she can make her own corsets, without me) but we did so well that we had time to assemble a book corset using the new pattern!
Commerical sewing patterns, just like ready-to-wear fashion, are not really designed to fit every person (although you would think they would be). It can be challenging to find patterns (and clothing) that fit well, especially in plus sizes. Many people learn to sew for this reason: they can't buy what they need, so they decide to make it.
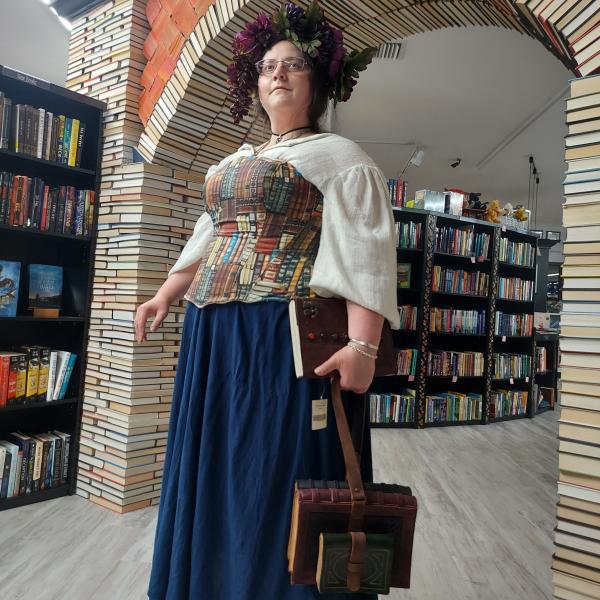
The "structure" of a corset is provided by an inner layer of fabric called coutil, whose tightly woven fibers support the shape of the garment. For the outside of the corset, we add a fashion fabric layer: in this case, a specialty cotton with beautiful bookish art printed on it. The book fabric is out of print and fairly rare now, but fortunately a corset takes a comparatively small amount of material so we had plenty to work with.
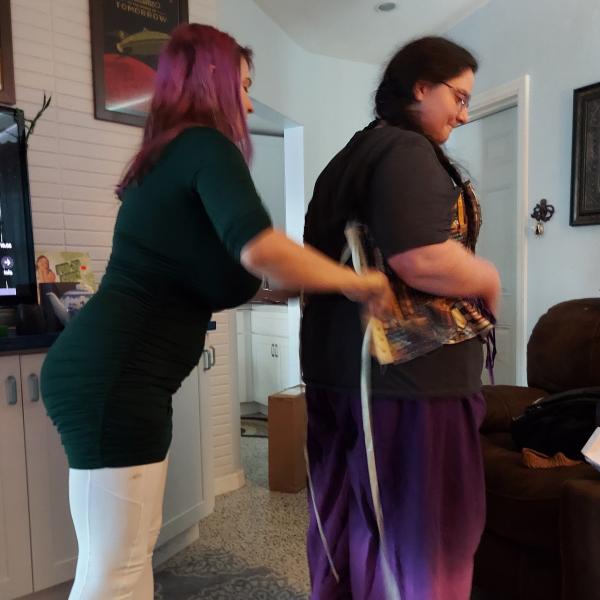
It's important to test the comfort and flexibility of the garment during fittings (if it hurts, it fits wrong!) so we entertained ourselves with all sorts of hijinx while Amber wore her half-finished corset. The important part for this particular one is that she can sit comfortably while wearing it.
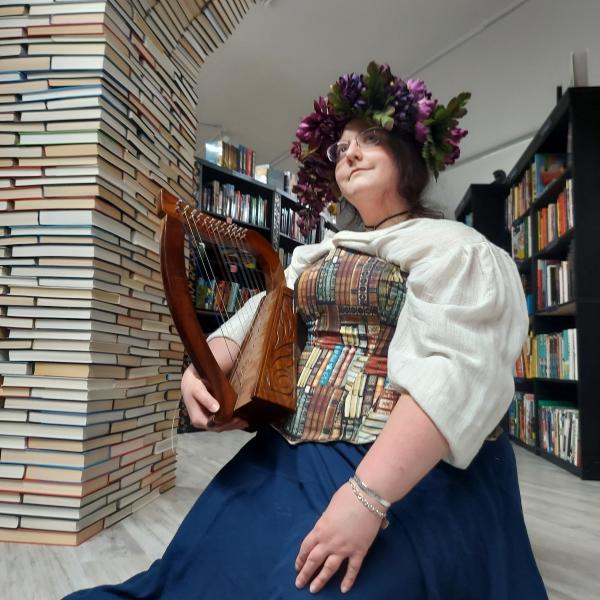
Naturally, we had to take photos of this corset with the book arch! I couldn't resist adding this leather book-bag that I have (From Rebecca Yee of Paint Yee Designs). We spent some time rummaging around the bookshop, looking for other accessories: a vintage lantern, a flower crown, a lap harp - and of course, lots of books.
HOW IT WAS MADE (the process of sewing a bookish corset)
The first step in making a custom corset (just like most sewing) is to get accurate measurements. Since Amber needs to be able to do replicate this process at home, without anyone else to help, we decided to build her a “duct tape dress form” which is essentially a perfect life size copy of one’s own body that can be used for fittings. You can order a fancy custom dress form, but the quick and cheap way to do this is the duct tape dress form, which is what we did.
Making a duct tape dress form:
- Cover the model (carefully! safely!) with plastic – we used a trash bag because it was the sturdiest option available. The model will have to stand while wearing this for a while so you probably want to do it indoors with good air conditioning so they don’t become uncomfortable.
- Use duct tape to create a grid pattern on the body, paying special attention to the center of the back and front (create a line down the center to use for reference).
- Carefully fill in the grid with more duct tape, making sure not to add bulk or affect the shape of the body by pulling the tape too tightly (remember you want an ACCURATE representation).
- Once the torso shape is complete, carefully cut down the center back to allow the model to escape. Now you have a duct tape shell (lined with plastic) that is the exact shape of your model’s torso.
- If you want to use it on a more traditional dress form, you can place it over a mannequin and then stuff it (with plush is the best if you can). Be sure to re-tape the back opening so that you don’t lose the accuracy of the torso shape.
After we had accurate measurements, I used my favorite corset pattern to create a custom pattern for Amber. Using measurements taken from the duct tape form, I drafted a new pattern to her size.
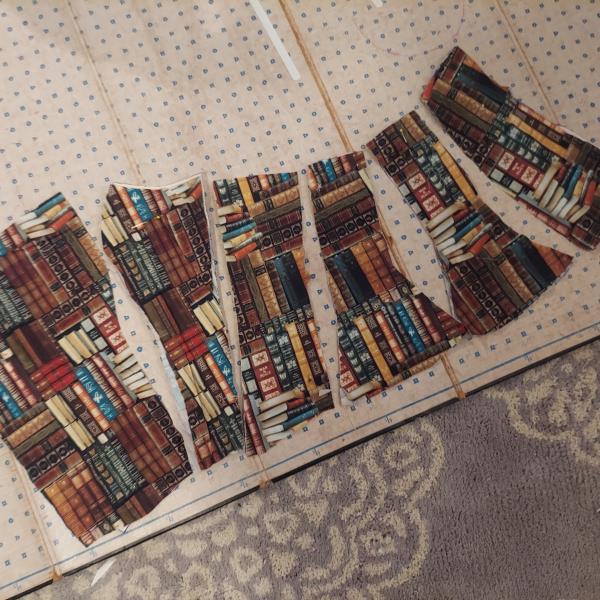
Next, we used the new pattern to cut out the corset pieces from coutil (a specialty fabric used for corsets). I assembled the pieces to create our first draft and have Amber try it on. One of the challenges of corset fitting is that corsets are closed using a grommet lacing panel – and grommets are always the LAST step in any garment. This makes it difficult to tweak the fit during early stages when there are no laces yet. To get around this, I use pre-made lacing panels that I attach to the mockup (the first draft).
During the first fitting I discovered several things that needed to be changed to improve the fit, and I marked them on the fabric in pencil (for me it works better to just write directly on the garment when I’m working out the fit like this). I made the changes with my sewing machine and then it was time for the second fitting.
Because we did such a good job with the original measurements, we only needed 4 fittings that required changes to the pattern (that is REALLY good for a custom corset). Then we copied the pattern so that she and I both have a copy of it (I hope to be able to use it as a starting point for other clients in the future).
With the pattern finalized, it was time to actually make the corset. Here’s a brief version of the corset making steps:
- Cut out the shell (the visible layer – books in this case), and cut out the coutil lining
- Sew the pieces together (for both the lining and the shell)
- Topstitch the seams for extra security (for both the lining and the shell)
- Mark and sew the boning channels (I use bias tape - some people use twill tape)
- Install the bones (corsets use a special steel boning), closing the ends with the machine
- Use hand stitching techniques to “floss” the bones so they are secure in place (some people do this last, but I like to floss the bones to the coutil layer so that I can still access the corset later if I need to make changes).
- Install the grommet / lacing panel on each end
- Sew the shell and lining together, over the lacing panel
- Turn it right side out
- Stay stitch the shell and lining together
- Finish the top and the bottom using bias tape (sew it on using the machine, then close it using hand stitching).
Since we were working under a tight timeline (I had only six days to create a working, correctly fitted corset pattern and teach Amber the key techniques needed for corsetry), there are some details about the finished garment that aren't up to my usual standards (a few uneven seams, and that type of thing). However, I'm really happy with it overall; and for a first draft, it's excellent! I can't wait to see what she makes out of her corset pattern now that she has the tools she needs...


